Along the same lines, a few users have voiced their concern that they are unable to use the WiFi on their devices. For some, the device isn’t able to scan for available networks whereas others have said that their WiFi automatically closes at random intervals. If you are also in the same boat, then this guide is here to help you out. In this tutorial, we will show you twelve different methods that shall help you fix the WiFi not working issue on your Android 12 device. So without any further ado, let’s get started.
How to Fix WiFi not working in Android 12
Do note that the methods listed below are applicable across all the devices that are running the latest Android 12. While the setting names might be slightly different (such as WiFi and Internet instead of WiFi and Network), but that shouldn’t be a cause of concern. Moreover, there’s no universal fix as such, You will have to try out each of the below-listed workarounds and then see which one spells out success for you. So with that in mind, let’s get started.
FIX 1: Try Basic Troubleshooting
First and foremost, you should give a try to the basic troubleshooting tips. More often than not they are sufficient when it comes to fixing the underlying issue. In this regard, your first course of action should be to re-verify that the internet is working well and good and there are no issues with the ISP or with your router. If that’s well and good, then consider restarting your device once and check if it fixes the WiFi not working issue on your Android 12 device.
FIX 2: Toggle Airplane Mode
Toggling on/off the Airplane Mode will disable and then re-enable all the mobile networks. This will then give these networks a fresh instance to work upon and hence the issue might be resolved in this fresh environment. So let’s put this method to test right away:
FIX 3: Enable Auto Connect
Enabling Auto Connect for your WiFi will instruct your device to automatically connect to that saved network if it is nearby to your location. So consider enabling this feature, which could be done as follows:
FIX 4: Enable Turn on WiFi Automatically
This feature will turn on the WiFI automatically as soon as it is nearby a saved network. After that, it will scan for the networks whose passwords are saved inside the data directory of your device and would then automatically connect it to the one that has the strongest signal. So you should consider enabling this feature, using the instructions given below.
FIX 5: Boot to Safe Mode
In some instances, a third-party app might conflict with the mobile network. To verify if that is the case and then rectify this issue, you will have to boot your device to the Safe Mode. This will disable all the third-party apps and your device will only be running with the stock apps that were initially present on your device. If you are able to use WiFi in this mode, then the culprit is indeed a third-party app. Therefore you should consider uninstalling all those apps, one at a time, after which the WiFi issues first started happening, The last app you remove which ends up fixing the issue would be the reason behind this problem. So it’s better to maintain a safe distance from that app in the near future as well and look for its alternatives. Moreover, you may now re-install all the other uninstalled apps.
FIX 6: Disable Metered WiFi Connection
Metered WiFi connection puts a cap on the maximum bandwidth that could be consumed during a particular period of time. Once you reach that limit, it will then prevent your device from accessing the internet any further.
FIX 7: Disable Battery Saver/Optimizations
If you have enabled the battery saver mode or put any restrictive measures in place, then consider disabling them for now. This is because, in order to preserve the battery, these features tend to stop all the background activities, and that includes disabling apps from accessing the internet in the background, Along the same lines, it will also stop the app’s background sync functionality over to the servers. So disabling them would prove to be the best approach and you could try it out using below listed steps:
FIX 8: Disable Mobile Data Always Active
This is a developer setting enabled on your device which makes sure that the carrier data remains active even if you have your WiFi turned on. This is done for a faster network switch, such as in case the WiFi is down, your device would be able to directly switch over to the mobile data without any delay. While this feature is no doubt quite a handy one, but in some instances, it tends to conflict with the normal functionality of the wireless network. So you should consider disabling it, via the below steps:
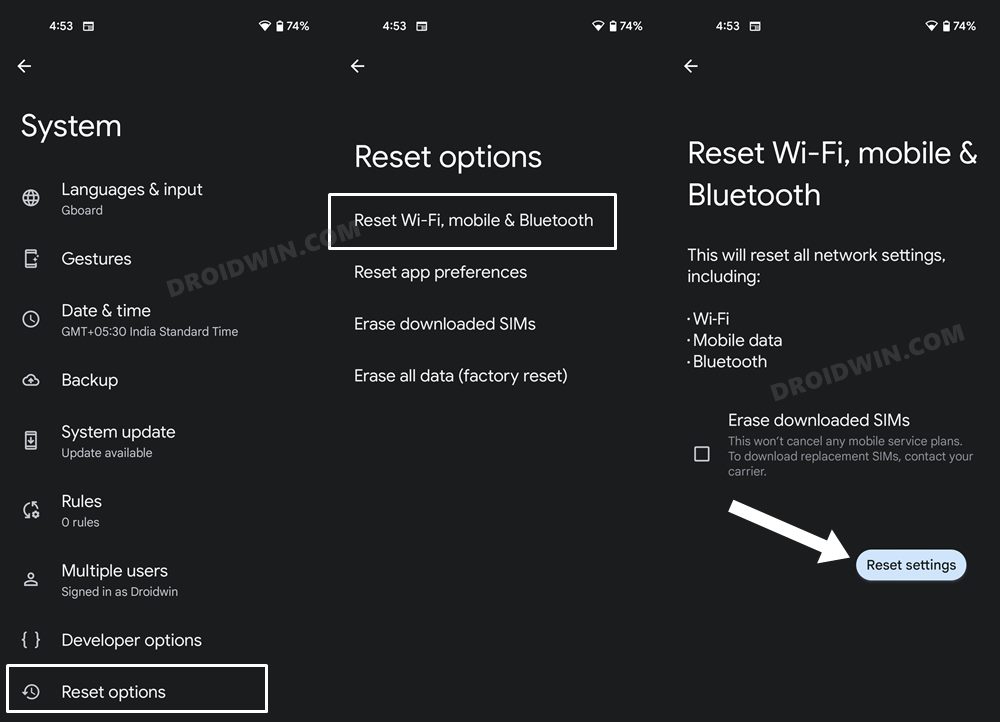
FIX 9: Reset Network Settings
If the stored network data gets corrupted, then it could spell out trouble for the entire network configuration on your device. Therefor the only way out is to reset the setting back to their factory default state. Do keep in mind that doing so will erase all the saved WiFi networks, so make sure that they are synced with your Google account. if that’s well and good, then let’s get started.
FIX 10: Reset Device
if none of the aforementioned methods managed to rectify the issue, then your last course of action should be to factory reset your device. This will delete all the data and bring the settings back to their default state- exactly how it was when you first unboxed your device. So it goes without saying that you should first take a backup of all the data (via Settings > System > Backup) and only then proceed with the below steps:
FIX 11: For Unlocked Bootloader Devices
if you are among those tech enthusiasts who like taking a stroll down the custom development, then there’s a possibility that you might have corrupted the modem partition. In that case, you will have to extract the modem file (NON-HLOS.bin or modem.bin) from the st0ck firmware and then flash it via Fastboot Commands. To try it out, please refer to our guide on How to Fix No WiFi, Calls, Network after Root, or Custom ROM. Likewise, you could also refer to How to Fix Corrupt EFS/No IMEI/Network Issues [3 Methods].
FIX 12: Contact the OEM
In case the issue is still persistent, then might be the case of a buggy software update. To rectify it, you should consider raising this issue across your device-specific official forum or on the unofficial ones like Reddit, XDA, Twitter (tag your smartphone manufacturer), etc. The earlier the developers get hold of this issue, the faster is the chance of an update being rolled out that would patch this issue. Once the update is released, you could then install it from the Settings > System > System Updates. On that note, we round off this guide on how you could fix the issue of WiFi not working on your Android 12 device. We have listed twelve different methods for the same, do let us know which one worked out in your favor. Likewise, all your queries are welcomed in the comments section below.
Bring Back the WiFi toggle in Quick Settings on Android 12How to Enable VoLTE and VoWiFi on any OnePlus DeviceHow to Fix No WiFi, Calls, Network after Root or Custom ROMBring Back the Old Download Menu UI in Chrome Android
About Chief Editor