The recovery mode is the partition where your stock or custom recovery reside. However, after the introduction of the A/B partition, most devices have done with this mode and you instead have to rely on the boot partition for dealing with recoveries. On the other hand, you would interact with the Fastboot Mode to unlock the bootloader or flash stock firmware. Likewise, you could also use this mode to execute Fastboot Commands for flashing binaries. But in recent years, there has been an addition of a new partition that doesn’t seem to be well documented across the web. Yes, we are talking about the FastbootD Mode. So what is this FastbootD Mode and how could you boot your device to this mode? Let’s check it out.
What is FastbootD?
With the launch of the tenth iteration of the OS, we got to welcome the ability to resize partition for the first time. This was done by relocating the fastboot implementation from the bootloader all the way to the userspace. One major benefit of this relocation is that you will be able the ability of Hardware Abstraction Layer to implement only the required vendor-specific parts. Moreover, the unification of bootloader and recovery is already on the cards, and this FastbootD mode is a huge step forward in this regard. But why this unification? Well, one obvious benefit is the usage of less storage space. Apart from that, there will be fewer partitions to deal with and Fastboot and Recovery will also be able to share the kernel and libraries.
How to Boot your Device to FastbootD Mode
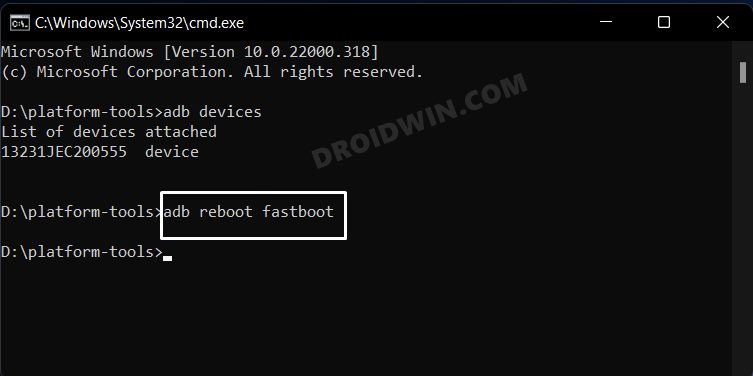
You could boot your Android device to FastbootD Mode using ADB Command, via Fastboot Command, and from the Stock Recovery as well. Let’s check out each of these three scenarios. But before that, make sure to checkmark the below prerequisites:
The Prerequisites
There are two major requirements that your device needs to qualify. We have listed both of them below, make sure to go through them.
STEP 1: Install Android SDK
First and foremost, you will have to install the Android SDK Platform Tools on your PC. This is the official ADB and Fastboot binary provided by Google and is the only recommended one. So download it and then extract it to any convenient location on your PC. Doing so will give you the platform-tools folder, which will be used throughout this guide.
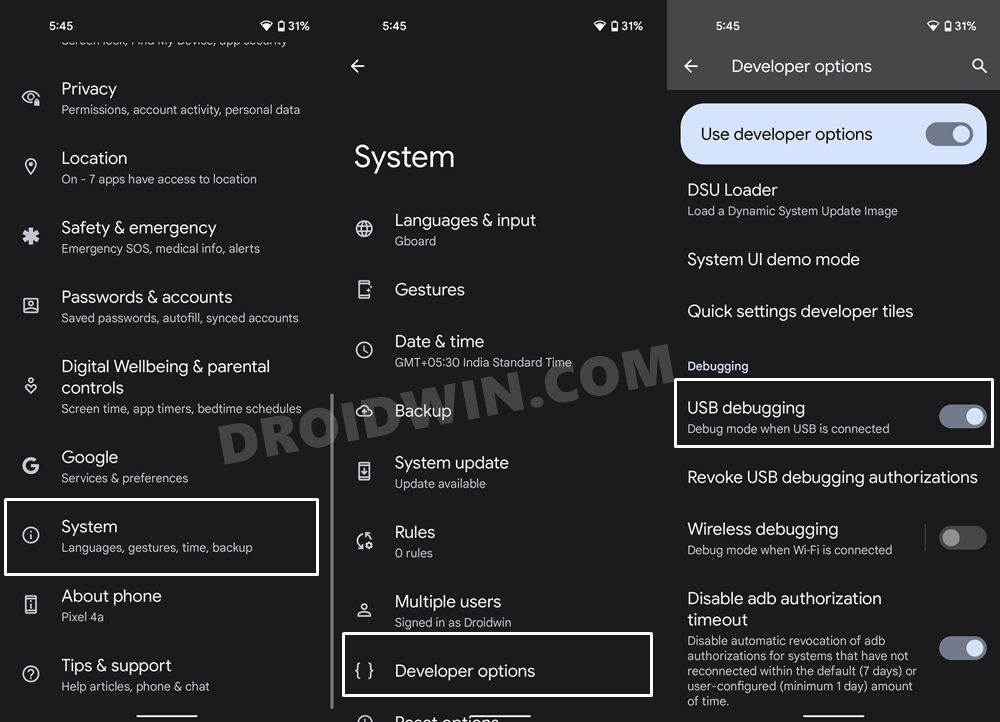
STEP 2: Enable USB Debugging [Optional]
[If you are currently unable to access the OS, then leave this step. Then when it comes to booting to FastbootD, you could refer to the Fastboot Mode method]. Next up, you will have to enable USB Debugging so that your device is recognizable by the PC in ADB mode.
This will then allow you to boot your device to Fastboot Mode. So head over to Settings > About Phone > Tap on Build Number 7 times > Go back to Settings > System > Advanced > Developer Options > Enable USB Debugging.
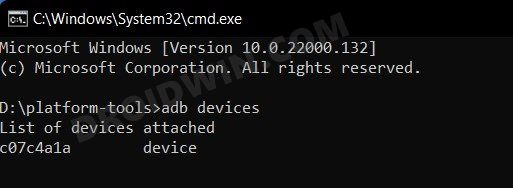
STEP 3: Verify ADB Connection [Optional]
If you are able to access the OS and are planning to take the ADB route or wish to boot your device to Fastboot via ADB, then verify that the ADB connection has been successfully established, using the instructions given below. However, if you cannot access the OS, then leave this step.
METHOD 1: Boot to FastbootD from ADB
METHOD 2: Boot to FastbootD from Fastboot Mode
NOTE: If you are unable to access the OS, then there’s an alternate way of booting to Fastboot. For that, power off your device. Then press and hold thePower and either Volume Up or Volume Down keys for a few seconds and your device will be booted to Fastboot Mode.
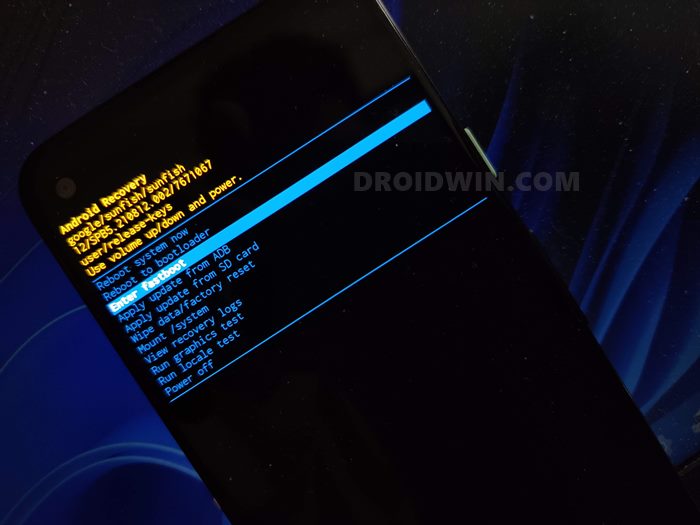
METHOD 3: Boot to FastbootD From Stock Recovery
NOTE: If you are unable to access the OS, then there’s an alternate way of booting to Stock Recovery. For that, power off your device. Then press and hold the Power and either Volume Up or Volume Down keys (the reverse of what you used for Fastboot!) for a few seconds and your device will be booted to Stock Recovery.
How to Exit FastbootD Mode
Once you are done flashing the required files in this mode (such as radio.img for Pixel devices), you could easily exit this mode in just a few clicks of a button or via a Fastboot Command. Let’s check out both these methods.
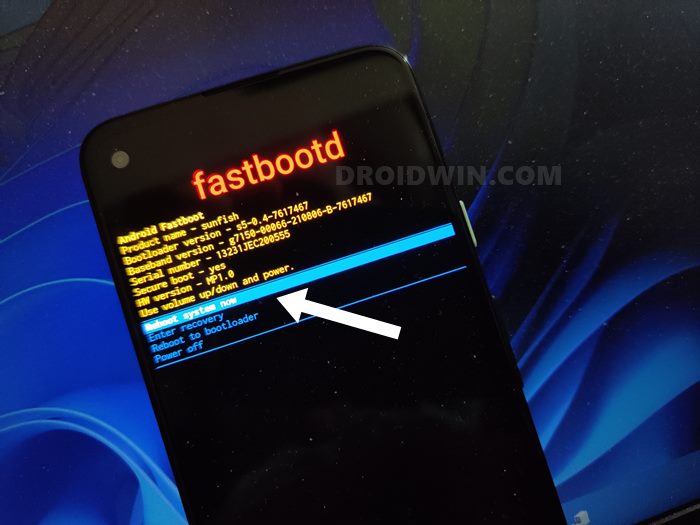
Exit FastbootD via Hardware Key
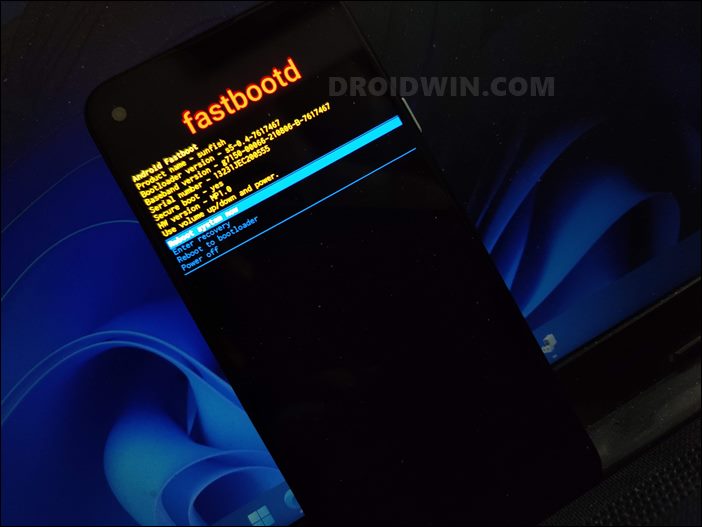
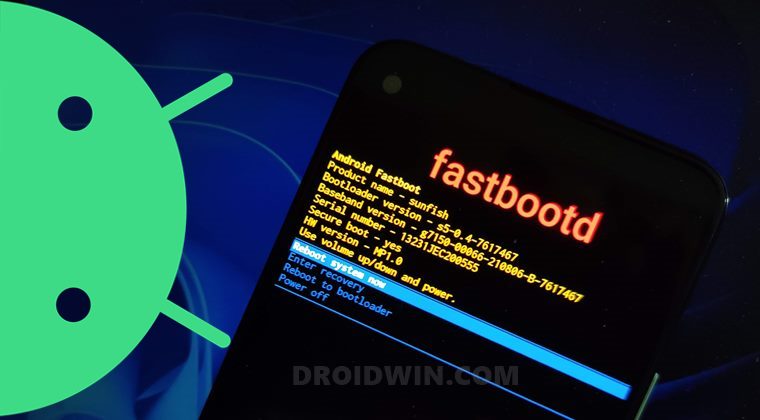
The shortest approach is by selecting the Reboot System Now option via Volume key and then pressing the Power key to confirm it. This will directly boot your device to the OS.
If you wish to take a longer approach, then select either Enter Recovery to boot your device to Stock Recovery or use the Reboot to Bootloader option to boot your device to Fastboot Mode. Then from the Recovery or Fastboot Mode, you could use the Reboot System option to boot your device to the OS.
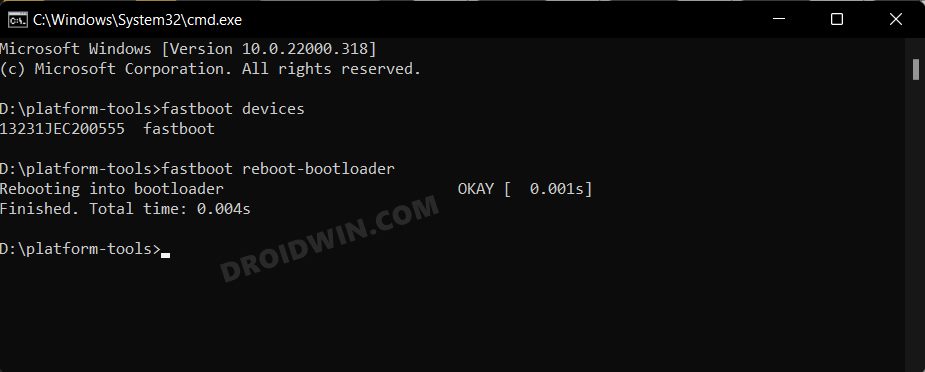
Exit FastbootD via Fastboot Command
With this, we round off the guide on how you could boot your device to FastbootD. Likewise, we have also listed out the steps to exit this mode. If you have any queries concerning the aforementioned steps, do let us know in the comments. We will get back to you with a solution at the earliest. [READ NEXT: Fix FAILED (remote: Partition should be flashed in fastbootd)].
About Chief Editor