If you have been into the open-source environment for the past couple of years, you might well have heard the Magisk quite a couple of times. A tool developed by topjohnwu, it is used for customizing your device and getting root access. You may ask that the same could also be achieved by SuperSu, so why use this? Well, Magisk is way more than just rooting your Android Device. Moreover, Google’s recent implementation of the ‘SafetyNet’ proved to be the final nail in the coffin for SuperSu. Why? And how did Magisk manage to escape it? Read the below guide for everything. Before beginning with the installation process, it is highly recommended that you at least know the basics of Magisk and its related terms. So read the below short guide on “Everything About Magisk- Manager, Modules and More”. [Don’t feel like going through the theory part? Click here to directly jump into the Installation process OR Go here to download the latest Magisk build].
How to Update Magisk ZIP and Magisk Manager (without TWRP)Fix Magisk Module Bootloop without TWRP RecoveryBest Magisk Modules of 2020 [PART-1][GUIDE] Flash ROMs/Magisk/TWRP/Kernels on A/B Partition Devices
What is Magisk?
Whenever one talks about Magisk, the word ‘systemless root’ is bound to appear. This is because of the fact that Magisk roots your device systemless. In simpler terms, it means that it is able to modify the system without even letting the device know that a change has occurred. Also, Magisk very intelligently makes all the changes in the boot partition rather than actually modifying the system partition. As a result, neither Google nor your device has any idea that the system has been tampered with.
What is SafetyNet
To further tighten the security, Google introduced a tool called ‘SafetyNet’. Its role was simple- to check whether there is any modification with the system partition or not. And if it is found that the system has been tampered with, it will identify that app and stop its functionalities.
Magisk vs SuperSu
Before Magisk came into the fore, it was SuperSu all along. It was the sole app that almost everyone used for rooting their device. But when Google implemented the SafetyNet, it started to lose its shine. As a result, people started looking for alternatives and hence Magisk was born. But what exactly was the issue with SuperSu? It was the way it used to work. SuperSu always made changes directly to the system partition rather than modifying the boot partition. Working in the ‘system’ way, rather than ‘systemlessly’- was all well and fine until Google introduced the SafetyNet feature. As already mentioned, SafetyNet checks modifications in the system partition and block any app that takes advantage of such changes. Since all the rooted apps used the root permission from SuperSu (which was responsible for tampering with the system), hence all these app could no longer function on these devices. Among the most common apps included Google Pay, Pokemon Go, and every banking app.
“How Magisk Managed to Save Itself”
This is because it never made any changes whatsoever to the system files or the system partition. The only changes it made were to the boot partition (that is why it is called a systemless root method). Because of this, it managed to escape from the eyes of SafetyNet. This lead to the birth of one of its most amazing features- Magisk Hide.
Magisk Hide
The biggest issue with SuperSu is that it modified the system partition. Hence SafetyNet would block all such apps which took root permissions from SuperSu. This is where Magisk managed to score big. With the introduction of the ‘Magisk Hide’ feature, the apps could easily evade from Google. Hence all these apps were able to get root access properly and work as expected.
Magisk vs Xposed
Next, you may ask how is Magisk different from Xposed. Although they both provide tons of modules to work with, that is where the similarities end. Apart from modules, Magisk is able to bypass SafetyNet, is constantly updated, provides the all-important ‘Magisk Hide’ feature and most importantly is able to root your Android device. Moreover, Xposed is also based on the same ‘system modification’. So with the introduction of SafetyNet, its performance and stability took more than a decent hit. But now that is a thing of the past. This is because Xposed could easily be installed as a Magisk Module, thereby working ‘systemlessly’ throughout the device. More on that could be read here: How to Install Xposed Framework on Android 9.0 Pie. Now enough of the theory part, let’s move on to the process of installing the Magisk Manager and Magisk Modules. Furthermore, we would also have a look at the process of unrooting the Android device.
How to Install Magisk Using TWRP Method
In order to get rooting privileges on your device, Magisk needs to be installed. Follow the below instructions on how to do so. But before beginning with the process, make sure to comply with the following requirements:
- Download the TWRP Recovery for your device. The official version could be downloaded from the TWRP website. But if no official version has been released till now, search for an unofficial one over at XDA. Make sure to download both the ZIP file (.zip) as well as the image file (.img). In some cases, you will only find a zip file (like the ‘Redmi K20 Pro’). So download the zip file only.
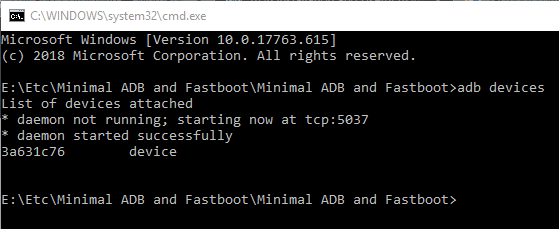
- Download and install the ADB and Fastboot Platform Tools. Inside the folder, while pressing the Shift key, right-click on an empty location. Select ‘Open PowerShell window here’. You may also have a look at our guide for the same.
- Enable USB Debugging on your device: Go to ‘Settings’ > ‘About Phone’ > Tap on ‘Build Number’ 7 times > Go back to ‘Settings’ > ‘System’ > ‘Advanced’ > ‘Developer Options’ > ‘Enable USB Debugging’ from there. Having an issue? Refer to our detailed guide on how to enable USB Debugging. This is all we would be needing right now. Head over to the next section to begin the installation process.
Steps to Install Magisk Manager on any Android Device
The below guide has been divided into sub-sections. The first section talks about booting the device to fastboot mode. In the second section, the device will be temporarily booted to TWRP Recovery. The third section would provide instructions on how to permanently install TWRP. Finally, instructions regarding the installation of Magisk would be provided. So let us begin with the process.
STEP 1: Boot your Device to Fastboot Mode
With the device now in fastboot mode, you need to temporarily boot it into TWRP recovery before installing it permanently.
STEP 2: Boot your device to TWRP Recovery
STEP 3: Permanently Install the TWRP Recovery
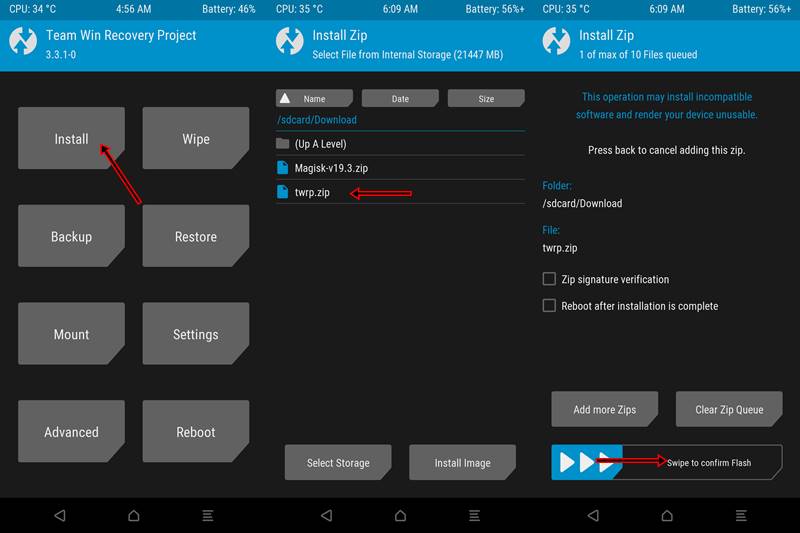
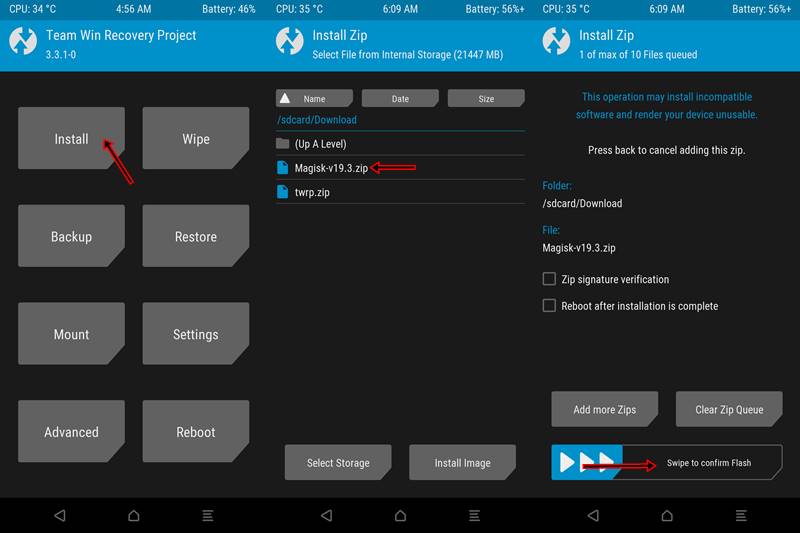
STEP 4: Install Magisk via TWRP Recovery
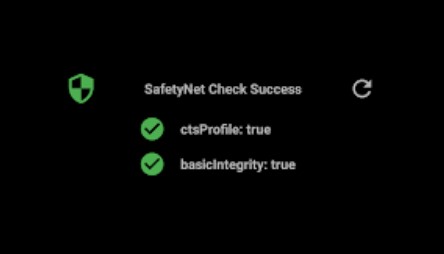
That’s it. Your device is now rooted with Magisk. On rebooting, you will see an app called Magisk Manager. Open it. If needed, update the Magisk or the Magisk Manager by clicking the ‘UPDATE’ button next to it. If both of them are updated to the latest version, you will see the text ‘INSTALL’ next to them. Leave as it is in that case. If you want to hide any app from the root, tap the menu button situated at the top left. Select the option ‘Magisk Hide’ and tick mark the preferred app. Moreover, you may also check the SafetyNet status. Just tap on the ‘Tap to start SafetyNet’ option. If it asks for downloading an extension, chose OK. You should see the message SafetyNet Check Success, with both the ‘ctsProfile’ and ‘basicIntegrity’ marked as true. So we had an in-depth discussion on “Everything About Magisk- Manager, Modules and More”. Now, let’s move onto the last part of the guide on how to unroot any Android device by removing/uninstalling the Magisk app. Follow each of the steps very carefully.
How to Install OTA Updates in Rooted Android DeviceHow to Permanently Install TWRP without TWRP ZIP File (only using TWRP.img file)Root Android Devices Without TWRP RecoveryHow to Fix TWRP Error 7 (While Flashing Custom ROM via TWRP)
How to Unroot any Android Device: Uninstall Magisk
In our guide on “Everything About Magisk- Manager, Modules and More”, we have discussed how installing the Magisk Manager gives you root access. You are now in a position to modify or alter the system files as you wish. Although gaining root access via Magisk has tons of benefits, yet it is not the complete picture. It may come with its fair share of trouble: depending on how you use it. Plus your device also becomes less secure once it’s rooted. Therefore, if there arises a need to unroot your device, you will have to uninstall the Magisk file from the device. There are various methods of doing so, but I will be covering the three easiest and widely used ones. But since I will be explaining them in detail, incorporating them in this article was not possible. Hence I have created a separate guide for the same. Do have a look: Guide: [3 METHODS] How to Unroot any Android Device by Uninstalling Magisk.
How to Disable DM-Verity or Android Verified Boot without TWRP.How to Update Magisk ZIP and Magisk Manager (without TWRP).Patch Stock Boot Image via Magisk and Flash it using FastbootHow to Root Android Devices via TWRP Recovery
Magisk Version 26.1
Grab hold of the latest magisk version 26.1 APK file from the below link. To install this version of Magisk [first-time root], then check out this guide. On the other hand, to update from an older version of Magisk, then refer to this guide.
Magisk Version 26.0
You may now get hold of the latest Magisk version 26.0 from below. On the other hand, if you are on an older version of Magisk and just want to update to the latest v26, then refer to our guide on How to Update Magisk to Version 26
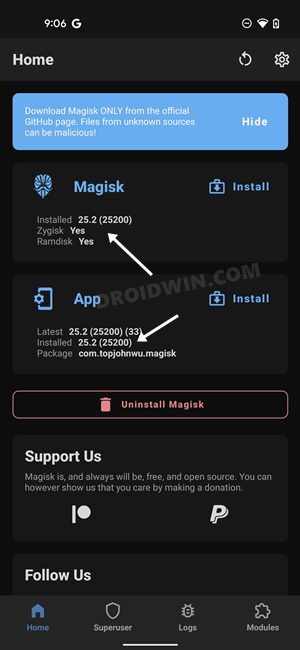
Magisk Version 25.2
Grab hold of the latest Magisk App version 25.2 from the below link. And if you want to update Magisk from an earlier version of Magisk, then check it this guide- How to Update Magisk to Version 25.2
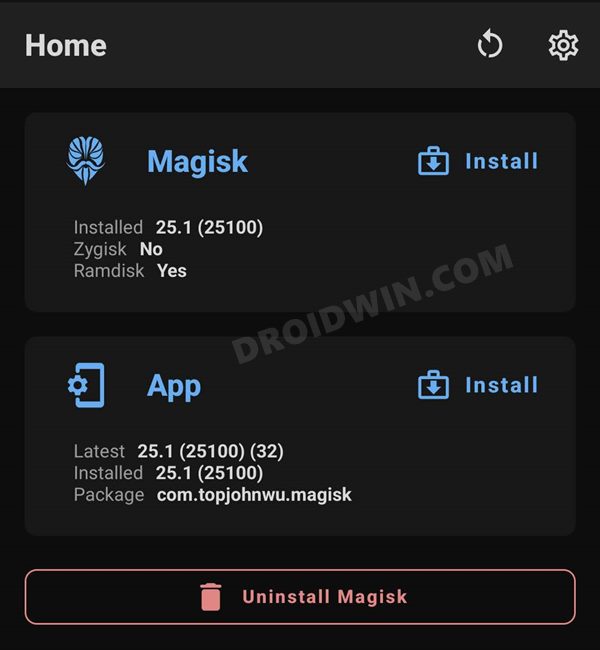
Magisk Version 25.1
You could now download the latest Magisk version 25.1 from the below official GitHub link. If you are currently on Magisk version 24.1, then you could easily update to version 25.1 using this guide- How to Update Magisk to Version 25.1.
Magisk Version 24.1 [Support Android 13]
The new Magisk version 24.1 now supports Android 13. I have tested it on Pixel 4A running the First Developer Preview build of Android 13. So if you are also on the latest OS build, then it is recommended to download this version only. Download: Magisk-v24.1.apk
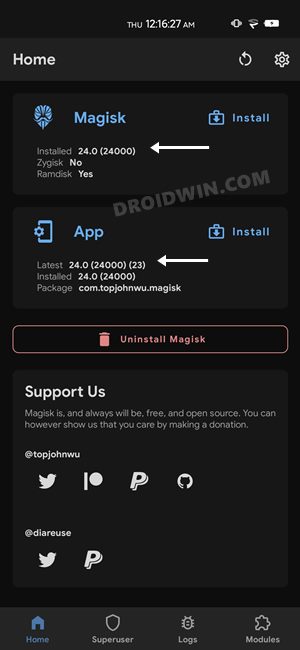
Magisk Version 24
Magisk Version 24 is now finally available to download, and with that, there are a plethora of new and noteworthy changes (and a few removals too). To begin with, this build is now compatible with Android 12. Then there’s the introduction of Zygisk as well.
On the flip side, the Magisk Modules repo and MagiskHide functionality have been removed. To read the complete changelog and to update your Magisk to the latest version 24, please refer to our guide on How to Install or Update Magisk to version 24- Welcome Zygisk!
Download: Magisk version 24 from GitHub [Direct Link]
Magisk Canary v23016 with vbmeta Fix
The latest build of Magisk Canary comes with the vbmeta header fix. Hence you wouldn’t have to manually disable the verity checks on Pixel 6/Pro and other devices running Android 12. Download: Magisk Canary App version 23016.
Magisk App v23.0
Download the Magisk App APK v23.0. For the unawares, starting with version 22, Magisk now comes inside a single APK package. This is the case with version 23 as well (and will always be for every newer version that would release after this). So you could directly install this app, patch the stock boot.img and flash it via Fastboot. But what about the Magisk ZIP? Well, just rename the Magisk APK to Magisk ZIP and it would automatically become a TWRP flashable ZIP!
Magisk App v22.0
From this build onwards, the Magisk Manager APK and Magisk Installer ZIP have been bundled into a single package. To know its installation steps, please refer to our guide: Download and Install (or Update) to Magisk v22 [New Method]. However, if you have knowledge regarding all this, and just want the download link, then here it is, directly from the official GitHub source: Magisk-v22.0.apk.
Download Magisk Canary Fix: Android 11 Root Issues
Many users aren’t able to patch the stock boot.img file via Magisk stable on their Android 11 device. The fix for the same is that you need to download the Magisk Canary build and then change the update channel from within the app. This guide will help you out: Fix Magisk patched boot.img issue while Rooting Android 11
Download: Magisk Canary (GitHub)
Magisk v21 | Magisk Manager v8.0.2
MagiskManager-v8.0.2.apkMagisk-v21.0.zipMagisk-uninstaller-20201003.zip
Magisk v20.4 | Magisk Manager v8.0.0
Magisk-Manager-v8.0.0.apkMagisk-v20.4.zipMagisk-uninstaller-20200323.zip
Magisk v20.3 | Manager Manager v7.5.1
MagiskManager-v7.5.1.apkMagisk-v20.3.zipMagisk-uninstaller-20200110.zip
Magisk v20.1 | Manager Manager v7.4
Magisk-v20.1.zipMagiskManager-v7.4.0.apkMagisk-uninstaller-20191102.zip
Magisk v20.0 | Magisk Manager v7.3.5
Magisk-v20.0.zipMagiskManager-v7.3.5.apkMagisk-uninstaller-20191011.zip
Magisk v19.3 | Magisk Manager v7.3.4
Magisk v19.3.zipMagiskManager-v7.3.4.apkMagisk-uninstaller-20190919.zip
Magisk v19.2 | Magisk Manager v7.2.0
Magisk-v19.2.zipMagiskManager-v7.2.0.apkMagisk-uninstaller-20190520.zip
Magisk v19.1 | Magisk Manager v7.1.1
Magisk v19.1.zipMagiskManager-v7.1.1.apkMagisk-uninstaller-20190501.zip
Magisk v19.0 | Magisk Manager v7.1.0
Magisk v19.0.zipMagiskManager-v7.1.0.apkMagisk-uninstaller-20190328.zip
Magisk v18.1 | Magisk Manager v7.0.0
Magisk-v18.1.zipMagiskManager-v7.0.0.apkMagisk-uninstaller-20190204.zip
Magisk v18.0 | Magisk Manager v6.1.0
Magisk-v18.0.zipMagiskManager-v6.1.0.apkMagisk-uninstaller-20181208.zip
Magisk v17.3 | Magisk Manager v6.0.1
Magisk-v17.3.zipMagiskManager-v6.0.1.apkMagisk-uninstaller-20181022.zip
Magisk v17.2 | Magisk Manager v6.0.0
Magisk-v17.2.zipMagiskManager-v6.0.0.apkMagisk-uninstaller-20180921.zip
Magisk v17.1 | Magisk Manager v5.9.1
Magisk-v17.1.zipMagiskManager-v5.9.1.apkMagisk-uninstaller-20180901.zip
Magisk v17.0 | Magisk Manager v5.9.0
Magisk-v17.0.zipMagiskManager-v5.9.0.apkMagisk-uninstaller-20180901.zip
Magisk v16.7 | Magisk Manager v5.8.3
Magisk-v16.7.zipMagiskManager-v5.8.3.apkMagisk-uninstaller-20180719.zip
Magisk v16.6 | Magisk Manager v5.8.0
Magisk-v16.6.zipMagiskManager-v5.8.0.apkMagisk-uninstaller-20180708.zip
Magisk v16.4 | Magisk Manager v5.7.0
Magisk-v16.4.zipMagiskManager-v5.7.0.apkMagisk-uninstaller-20180627.zip
Magisk v16.3 | Magisk Manager v5.6.4
Magisk-v16.3.zipMagiskManager-v5.6.4.apkMagisk-uninstaller-20180328.zip
Magisk v16.2 | Magisk Manager v5.6.3
Magisk-v16.2.zipMagiskManager-v5.6.3.apk
Magisk v16.1| Magisk Manager v5.6.2
Magisk-v16.1.zipMagiskManager-v5.6.2.apk
Magisk v16.0 | Magisk Manager v5.6.1
Magisk-v16.0.zipMagiskManager-v5.6.1.apk
Magisk v15.4 | Magisk Manager v5.6.0
Magisk-v15.4.zipMagiskManager-v5.6.0.apk
Magisk v15.3 | Magisk Manager 5.5.5
Magisk-v15.3.zipMagiskManager-v5.5.5.apk
Magisk v14.5 | Magisk Manager v5.4.3
Magisk-v14.5.zipMagiskManager-v5.4.3.apk
Magisk v14.3 | Magisk Manager v5.4.0
Magisk-v14.3.zipMagiskManager-v5.4.0.apk
Magisk v14.2 | Magisk Manager v5.3.5
Magisk-v14.2.zipMagiskManager-v5.3.5.apk
Magisk v14.0 | Magisk Manager v5.3.0
Magisk-v14.0.zipMagiskManager-v5.3.0.apk
Magisk v13.3 | Magisk Manager v5.1.0
Magisk-v13.3.zipMagiskManager-v5.1.0.apk
Magisk v13.3 | Magisk Manager v5.0.5
Magisk-v13.2.zipMagiskManager-v5.0.5.apk
Magisk v13.1 | Magisk Manager v5.0.4
Magisk-v13.1.zipMagiskManager-v5.0.4.apk
Magisk v12.0 | Magisk Manager v4.3.0
Magisk-v12.0.zipMagiskManager-v4.3.0.apk
Magisk v11.5 | Magisk Manager v4.2.7
Magisk-v11.5.zipMagiskManager-v4.2.7.apk
Magisk v11.1 | Magisk Manager v4.1.0
Magisk-v11.1.zipMagiskManager-v4.1.apk
Some Other Magisk Manager APKs and ZIP Files
Magisk Manager ZIP: Magisk-v9.zip | Magisk v8 | Magisk-v7.zipMagisk APKs: MagiskManager-v4.0.apk | MagiskManager-v3.1.apk | MagiskManager-v3.0.apk
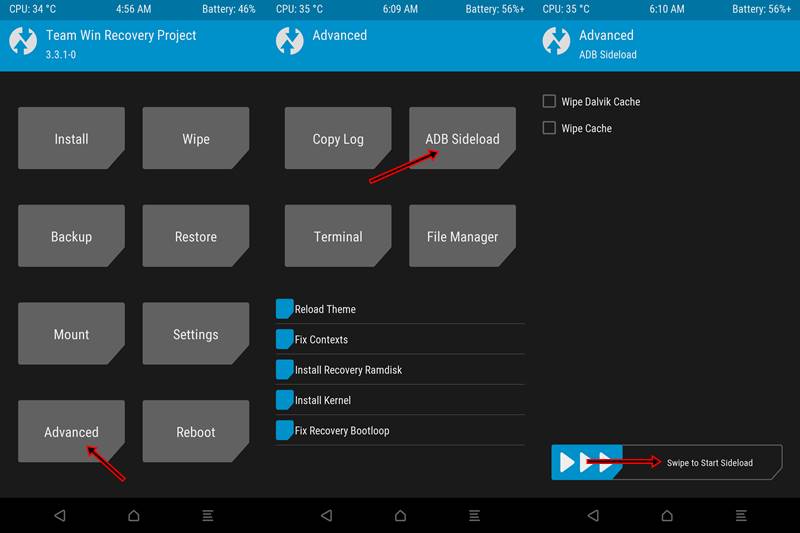
Q2) I Cannot flash the TWRP from the method given in STEP 3. A2) If that is the case, try the other method. It is known as ADB Sideload and the process will be carried as follows:
TWRP will now definitely be permanently installed on your device. Q3) Flashing Magisk as mentioned in STEP 4 gave an error. How to proceed? A3)Again, you will have to take the help of ADB Sideload. Follow the below instructions: That’s it. Magisk will now be successfully installed on your device. So this was a comprehensive guide regarding “Everything About Magisk- Manager, Modules and More”. In a nutshell, we discussed: With that, we come to the end of our tutorial on “Everything About Magisk- Manager, Modules and More”. If you have any issues with respect to any part of this guide, do let me know in the comments section below. I Will clear all of your doubts in the easiest way possible. Cheers 🙂
About Chief Editor