While it is still applicable on some MTK devices, but there are a plethora of others that don’t take this route. More often than not, these are the devices with the underlying MT67xx, MT816x, and MT817x chipsets. Since there are a plentitude of such devices, it becomes a really challenging task in gaining administrative privileges. But thanks to the open-source nature of the Android ecosystem, the developers always manage to find a workaround. And such is the case this time as well.
How to Install TWRP on MediaTek using SP Flash ToolHow to Root any MediaTek Device Using SP Flash ToolDetailed Guide to Create and Port TWRP Recovery for any Android DeviceHow to Unbrick any MediaTek Phone using SP Flash Tool
How to Root any MediaTek ARMv8 Device
First off, the instructions are applicable on devices running Mediatek MT67xx, MT816x, MT817x, or MT6580 chipsets only. Furthermore, the below steps will give you a working adb shell with root privileges. So what does it mean? Well, it means that its role is not to give root permissions to any app installed on your device. Rather it gives you the command shell that comes with the root and administrative capacities. You could execute the desired root command inside that shell. With that said, there exists a method to install the Magisk Manager app on your device and manage the root capabilities for third-party apps- all on a locked bootloader! If you are interested in checking that out, then you may refer to our detailed guide on. Droidwin and its members wouldn’t be held responsible in case of a thermonuclear war, your alarm doesn’t wake you up, or if anything happens to your device and data by performing the below steps to root your MediaTek ARMv8 device.
STEP 1: Download Android SDK
To begin with, download and install the Android SDK Platform Tools on your PC. Then extract it to any convenient location on your PC. This shall give you the platform-tools folder. We will be using it throughout this guide, so keep this folder open.
STEP 2: Enable USB Debugging
Next up, enable USB Debugging on your device. This is because we will be using the ADB Push command to transfer files from the PC to your device. So head over to Settings > About Phone > Tap on Build Number 7 times [MIUI Number in Xiaomi devices] > Go back to Settings > System > Developer Options > Enable USB Debugging.
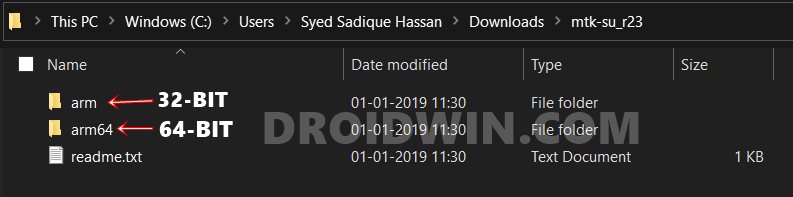
STEP 3: Download MTK-SU Binary
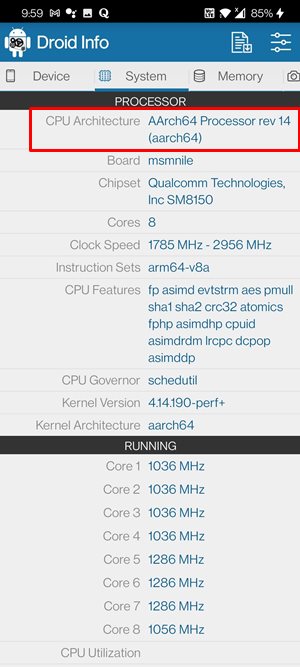
STEP 4: Check Android Device’s CPU Architecture
STEP 5: Root MediaTek ARMv8 Devices
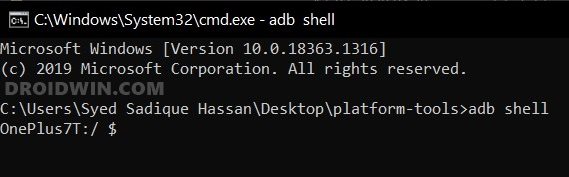
However, if the CMD is stuck in this command screen even after 10-15 seconds, then press the Ctrl+C shortcut to terminate this command. Then use the exit command to close the shell. Type in all the commands one by one (adb shell onwards). You should now achieve success. That’s it. With this, you have got the working adb shell with root privileges and on that note, we conclude the guide on how to root your MediaTek ARMv8 device. If you have any queries concerning the aforementioned steps, do let us know in the comments. We will get back to you with a solution at the earliest.
About Chief Editor